Monday, April 23, 2012

My First Android App - HelloViews

The title of this post may be a misnomer. We all know a programmer's first program in any new language is guaranteed to be "Hello, World" and that was no different for me. So this may actually be my third or fourth app, but it's the first one I've written that does something slightly interesting (at least to developers) and that I can say I'm proud of.

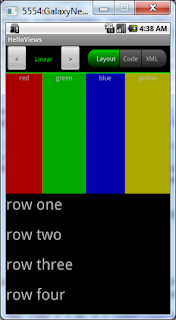
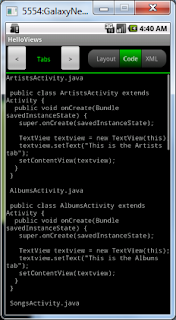
What I did is combined the Hello Views tutorials from the Android developer site into a single app. You can think of it as a "views viewer" that allows you to see some of the possible layouts along with the corresponding code and XML used to create them.

Here's a couple screenshots (using an emulator):


No more ado: Download the APK file now!

If you're stuck on how to install the APK as a program on your Android device, you'll have to do a web search for "side load" and the name of your device. I do have some directions for how to side load an app on the Kindle Fire here.

Please feel free to comment with any thoughts on my first app, especially to let me know if you have any trouble using it on your phone/tablet/Fire/whatever! Also if any developers out there are interested in the source of this app, just let me know and I'll be happy to post it.

Friday, April 6, 2012

Hello World on Kindle Fire... YATA!

For anyone not versed in the original Heroes television series, the Japanese time-traveling hero named "Hiro" would exuberantly exclaim "Yata!" when he accomplished something awesome. In the same vein, I'm excited that after only a day I was able to create my first Hello World application and actually run it on my Kindle Fire! Below are the brief steps taken to make it work. This is not a comprehensive guide but includes some gotchas to hopefully help anyone else who might be stuck.

Create a working app that loads in the Android Emulator:
  • Install a JDK (Java Development Kit) - I used the Java Platform (JDK) 7u3 available from Oracle here
  • Install Eclipse IDE - I grabbed the Eclipse IDE for Java Developers here
  • From developer.android.com, download and install Android SDK. This also installs the SDK Manager, which itself is pretty darn cool.
  • Follow the SDK installation directions here. One of the things this will guide you through is installing the ADT (Android Developer Tools) plugin for Eclipse, which is used to simplify tasks that would otherwise have to be done manually. For example, it provides nice New Project and Export wizards for creating and distributing your applications. FYI the ADT plugin took a LONG time to install on my system; I let it do its thing overnight.
  • If it wasn't done as part of the SDK installation, install the latest platfrom from Android SDK Manager, which can be opened from directly inside Eclipse after the ADT plugin is installed and Eclipse is restarted.
  • Follow the Hello World tutorial. This will guide you through setting up an AVD (Android Virtual Device), running your app in the emulator, etc.
  • Edit your AVD in Eclipse, setting the Snapshot option to Enabled. This greatly improved the loading speed of the emulator for me.

Building your app for distribution:
To get your shiny new app on the Kindle Fire, or any device really, you have to build it in release mode and sign the output APK file. Fortunately this is a relatively easy process from within Eclipse once you have the ADT plugin installed.
  • First you need to make sure to add the JDK bin folder's path to your system's PATH environment variable. If you don't know how to do this you will have to search (as did I) to figure out the correct way to edit the "Path" environment variable on your OS. Once you do this, Eclipse will be able to use the KeyTool and JarSigner SDK tools to build your APK file.
  • In Eclipse, click to edit your project's AndroidManifest.xml file. You want to edit the Min SDK version, settings its value to "8" (without quotes). SDK version 8 is the API Level associated with Android version 2.2. The reason for this is that, I believe, the Kindle Fire runs an altered version of Android v2.3; so if you use an SDK version much higher than 8 (e.g. the default for mine was 15), the Kindle Fire won't be able to open the package when you transfer it to the device. I know I'm using the API level for Android v2.2 when I said the Fire is running v2.3 - feel free to experiment with the number, I just know that it definitely works with min API level set to 8.
  • Now click the root of the project in the Package Explorer.
  • Select File > Export, select the Android option, then select the Export Android Application item and click Next.
  • Enter a project name and click Next.
  • If this is your first run exporting an app, choose to create a new "keystore". Enter a folder path followed by the name you want for your new keystore (e.g. C:\android\keystores\mykeystore). In the example, the name of the output keystore file will be "mykeystore.keystore" (the extension is .keystore). Also specify a password and click Next.
  • Enter some info to identify the key that will be used to sign your APK file; it is highly recommended to set the Validity (number of years the key is valid) to a value greater than 25. Once all required info is entered, click Next.
  • Finally, specify the destination for your APK output file and click Finish!

Sending your app to the Kindle Fire:
Now comes the fun part!
  • Transfer your new APK output file to the Kindle Fire. You can do this directly using a micro-USB cable to connect your Fire to your computer, or you can email the file to an email address you can check on the Fire. If you send the APK file as an email attachment, you will be able to save it to the Fire's internal Downloads folder.
  • Download and install the free ES File Explorer from the Amazon app store.
  • In the Fire's settings, select More > Device and then set the option "Allow Installation of Applications From Unknown Sources" to ON.
  • Now in ES File Explorer, navigate to the location where you saved the APK file (the Downloads folder if you saved the file from an email attachment).
  • In ES File Explorer, click the file and you should be prompted to install the application. Obviously, hit Install to install the application!

If you followed ALL of those steps, your new application should be installed on your Kindle Fire and ready to run from the Apps view. YATA!!!

Thursday, April 5, 2012

On Losing Control...

I'm still contemplating creating an Android game (or even just a quick "Hello, World!" to get my feet wet) to try out on my Kindle Fire. If I get a little more time I might even start that tonight. But a month or so ago I bought the e-book Unreal Development Kit Game Programming with UnrealScript: Beginner's Guide (which yes, I am reading on the Fire) to get a feel for UDK UnrealScript programming. At first, I was thinking it's pretty cool. I mean, you get to learn about some of the classes in UDK and in a matter of minutes you can have an Unreal-style game up and running. What I'm struggling with, however... is what feels like a total loss of control.

With XNA development, where I had to do everything, I could do exactly that: just about anything. Of course, the ability to do anything came at a heavy price: lots of complex or ground-breaking code with minimal assistance from our favorite search engines. I still recall the horror that was getting the simplest model animations to work in XNA 3.1 because of the lack of animation support out-of-the-box. But I digress.

I just have to say, in this as-yet unfamiliar world of UDK UnrealScript programming it feels weird writing script "classes" and not having full control over how things work. But maybe I just haven't learned enough yet. I have only completed about 40% of the book anyway. We'll see where that leads, but for now I start again at the beginning of every programmer's journey.... Hello, World!

Friday, February 10, 2012

Android Mobile Game Development

When I first started this blog, I was most interested in creating PC games using C++ with Direct3D, part of the DirectX suite from Microsoft. After a couple projects on my own, I started working with a team of guys interested in developing for the XBox 360 (and PC) using the C# language and the XNA Game Studio engine/framework. Now that our tower defense game project is winding down, and having recently purchased a Kindle Fire, I'm considering creating an Android game I can play on the Fire.

In the past couple years I've held off on learning an engine in the interest of "knowing how things work under the hood". So I think it's definitely time to learn an engine or two. I'm not sure if Android development is the right path for me, but here's a quick collection of notes based on the article Android Game Elements and Tools to get me started. Hopefully it will help some new Android developers out there too; just be sure to check out the article if you need more detailed instructions on getting things set up.

  • Develop Java code in the Eclipse IDE.
  • The Java code will run in the Dalvik virtual machine on Android devices.
  • Learn the Android SDK at developer.android.com.
  • Set up an Android Virtual Device (AVD) to run the program in an emulator.
  • Use the AndEngine game engine.
  • Use the Java port of the Box2D physics engine. JBox2D is included in AndEngine.
  • Use free tools Inkscape and GIMP for graphics.
  • Use free tools Audacity and MuseScore for sound effects and music, respectively.